Over the last couple months I’ve been rebuilding my homelab from the ground up. Homelabbing is a common hobby for those working or interested in tech. It’s a great exercise in autonomy and digital freedom and has reignited my interest in technology again. However, when you take on hosting services for yourself, you need to account for the risks you take on that are normally managed by third parties.
As other cyber security professionals and jaded tech workers can attest, once you’ve seen seen the fallout of poor configuration first hand, you develop a higher degree of paranoia and risk aversion than those who haven’t. I funnelled my paranoia into what I believe is a reasonably hardened homelab stack.
By no means is it perfect, nor is this intended to be a guide, but rather I aim to demonstrate how following principles of defence in depth - implementing layers of security and redundancy - and being calculated about the accepted risks can be important not just for organisations but also for normal people. You can put security, resilience and continuity at the forefront of design decisions, rather than making it an afterthought, while still retaining a fluid, relatively frictionless user experience. Security (and privacy) do not need to be inconvenient.
The cloud is ultimately just someone else’s computer. I figured with the increasing enshittification of big tech and privacy concerns from major players across the board, there is tangible benefit to setting up my own personal cloud and file storage. My data may as well be on my computer, free from anyone else’s hands, prying eyes or business interests. That said, my setup does trust a handful of third parties at various stages - by no means is there perfect privacy or total self-reliance (this is unattainable, for me atleast). However, trade offs are understood, accounted and compensated for.
The primary purposes of this project so far has been to create a system that is:
- Reliable and relatively painless (after initial config, tinkering should be optional - not mandatory)
- Genuinely user friendly, with functionality close enough to standard commercial cloud offerings and other paid services.
- Somewhere to store personal data
- Something capable of streaming my personal media across my LAN
- Create a platform to use and integrate with future projects
- Do all of the above securely, minimising risks along the way with deliberate and cautious design.
I took this project as a learning opportunity for infrastructure-as-code, managing all suitable configuration via a private Git repo, as much as possible (preferencing Docker apps for this reason). This is beneficial not just for version control but also if I need to rebuild, and it also keeps everything organised. I designed my lab architecture so that there is a high availability of critical services and resilience during power outages. Furthermore, restoration of downed services can occur remotely, from a terminal emulator on my phone with just a few commands. There’s a ‘3-2-1 backup’ for my personal data, including an encrypted cloud backup. I also created service accounts to run important apps, following ’least privilege’ so these accounts (and the apps they run) can only read/write to the their relevant parts of the file system, rather than everything. I also added a UPS server, meaning my hardware is reasonably protected from power outages, minimising the chance of data corruption or loss.
From a networking perspective, I used VLANs to segment and segregate diferent areas of my network, separating homelab servers, personal/trusted devices, untrusted devices like my smart TV, and my work devices. I exposed a handful of services to the public internet without port-forwarding which further reduces attack surface and ultimately risk. I did open port 51820 for Wireguard which enables secure remote access to my homelab without unneeded complexity.
Functionally, the average day-to-day use cases of my lab are simple things like file storage (using both a LAN-only SMB share and also publicly-exposed (but appropriately secured) ‘cloud’ apps like Nextcloud/Immich), as well as media streaming for music, TV and movies. Like any good homelab, we are running network level ad/tracker blocking and recursive DNS, improving privacy and reducing the pain of the ad-infested modern web.
While there’s always more to do, for now I’m at a point where I can say the first phase is complete.
Disclaimer: AI was used during the dev process of the homelab - the usual stuff like debugging, custom scripting, sense-checking some general architectural considerations, etc. This became particularly helpful as I shifted to using coding agents for semi-autonomous development of new Docker stacks with multiple containers and deliberate architectural considerations.
However, AI was not used during the writing of this blog - nor any blog on my site. Words are 100% my own - typos, tangents and all. I’ve spent many hundreds of hours writing essays throughout university and arguing with strangers online. I’m proud of my writing style I’ve crafted over time and I strongly believe my personal website should reflect that.
Images
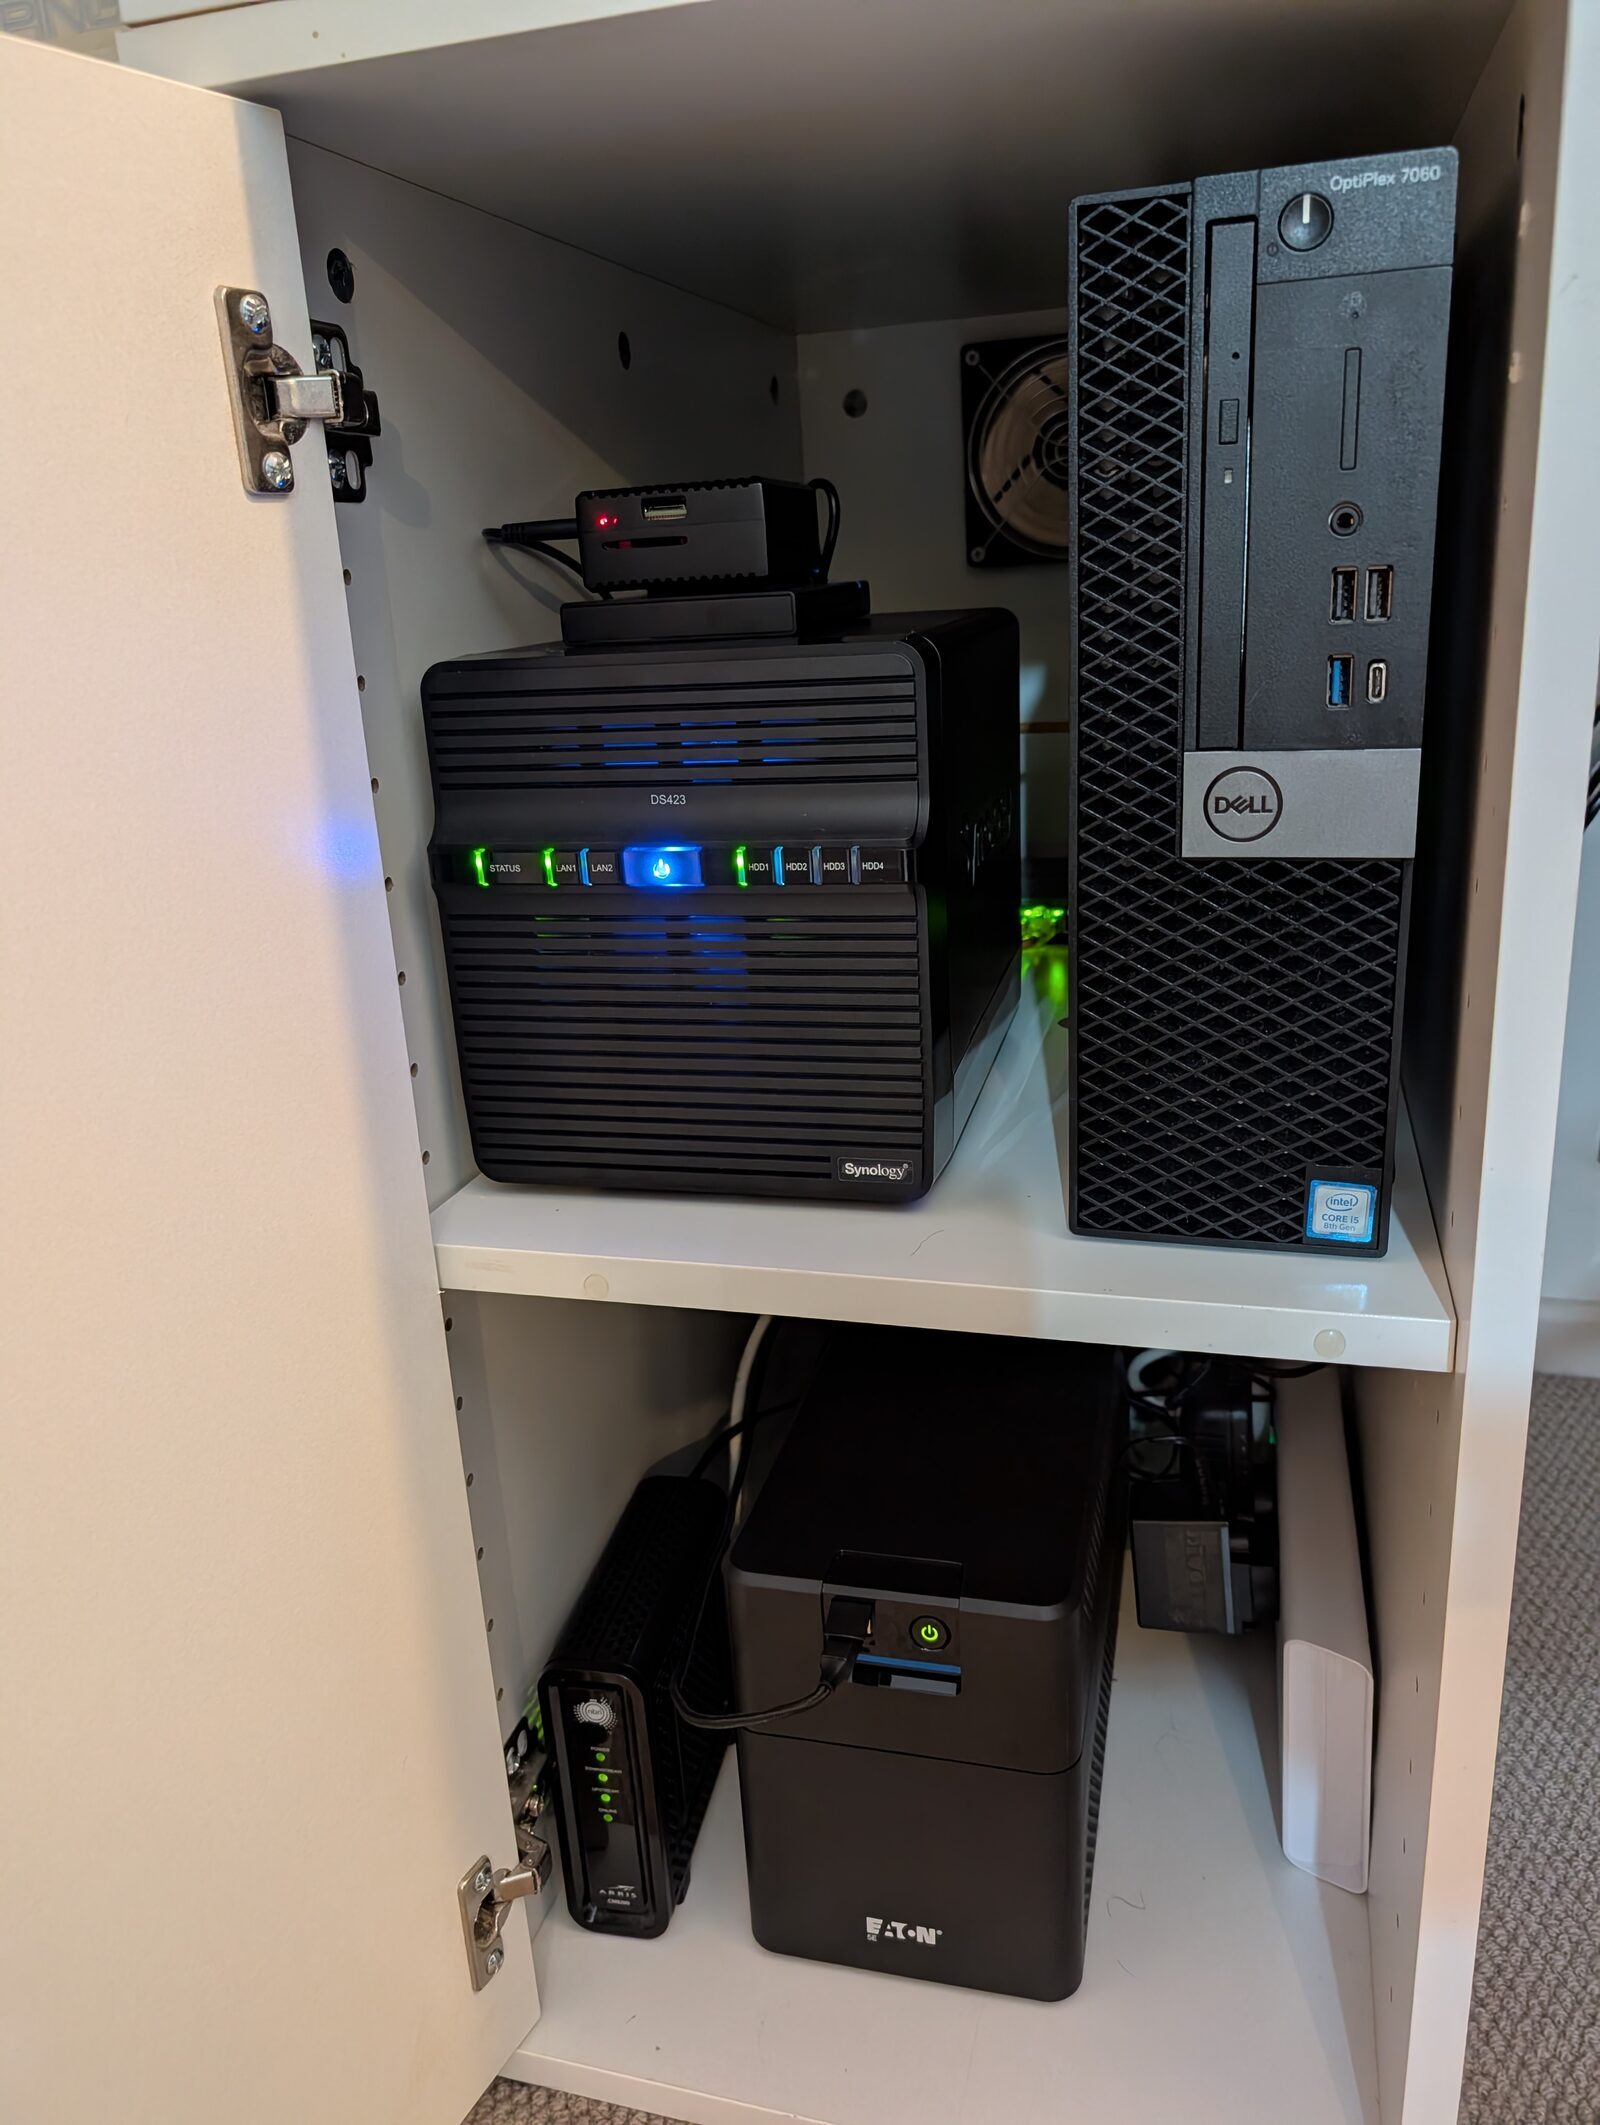
Tangent aside, here’s a photo and few design maps of the ’lab’:
Photo
Network Topology / VLAN Map:
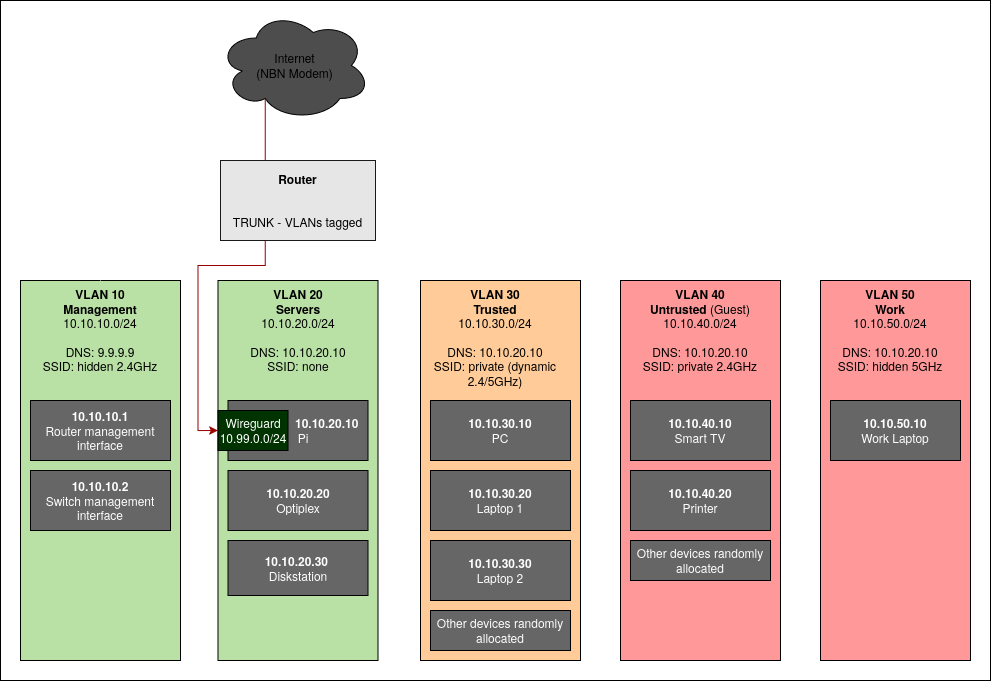
- Colour coded in terms of trust level. Not to say I don’t trust my work device - more so it warrants a high degree of isolation and care.
- The red line indicates the only forwarded port on my router: 51820 for Wireguard.
Service / Application Map:
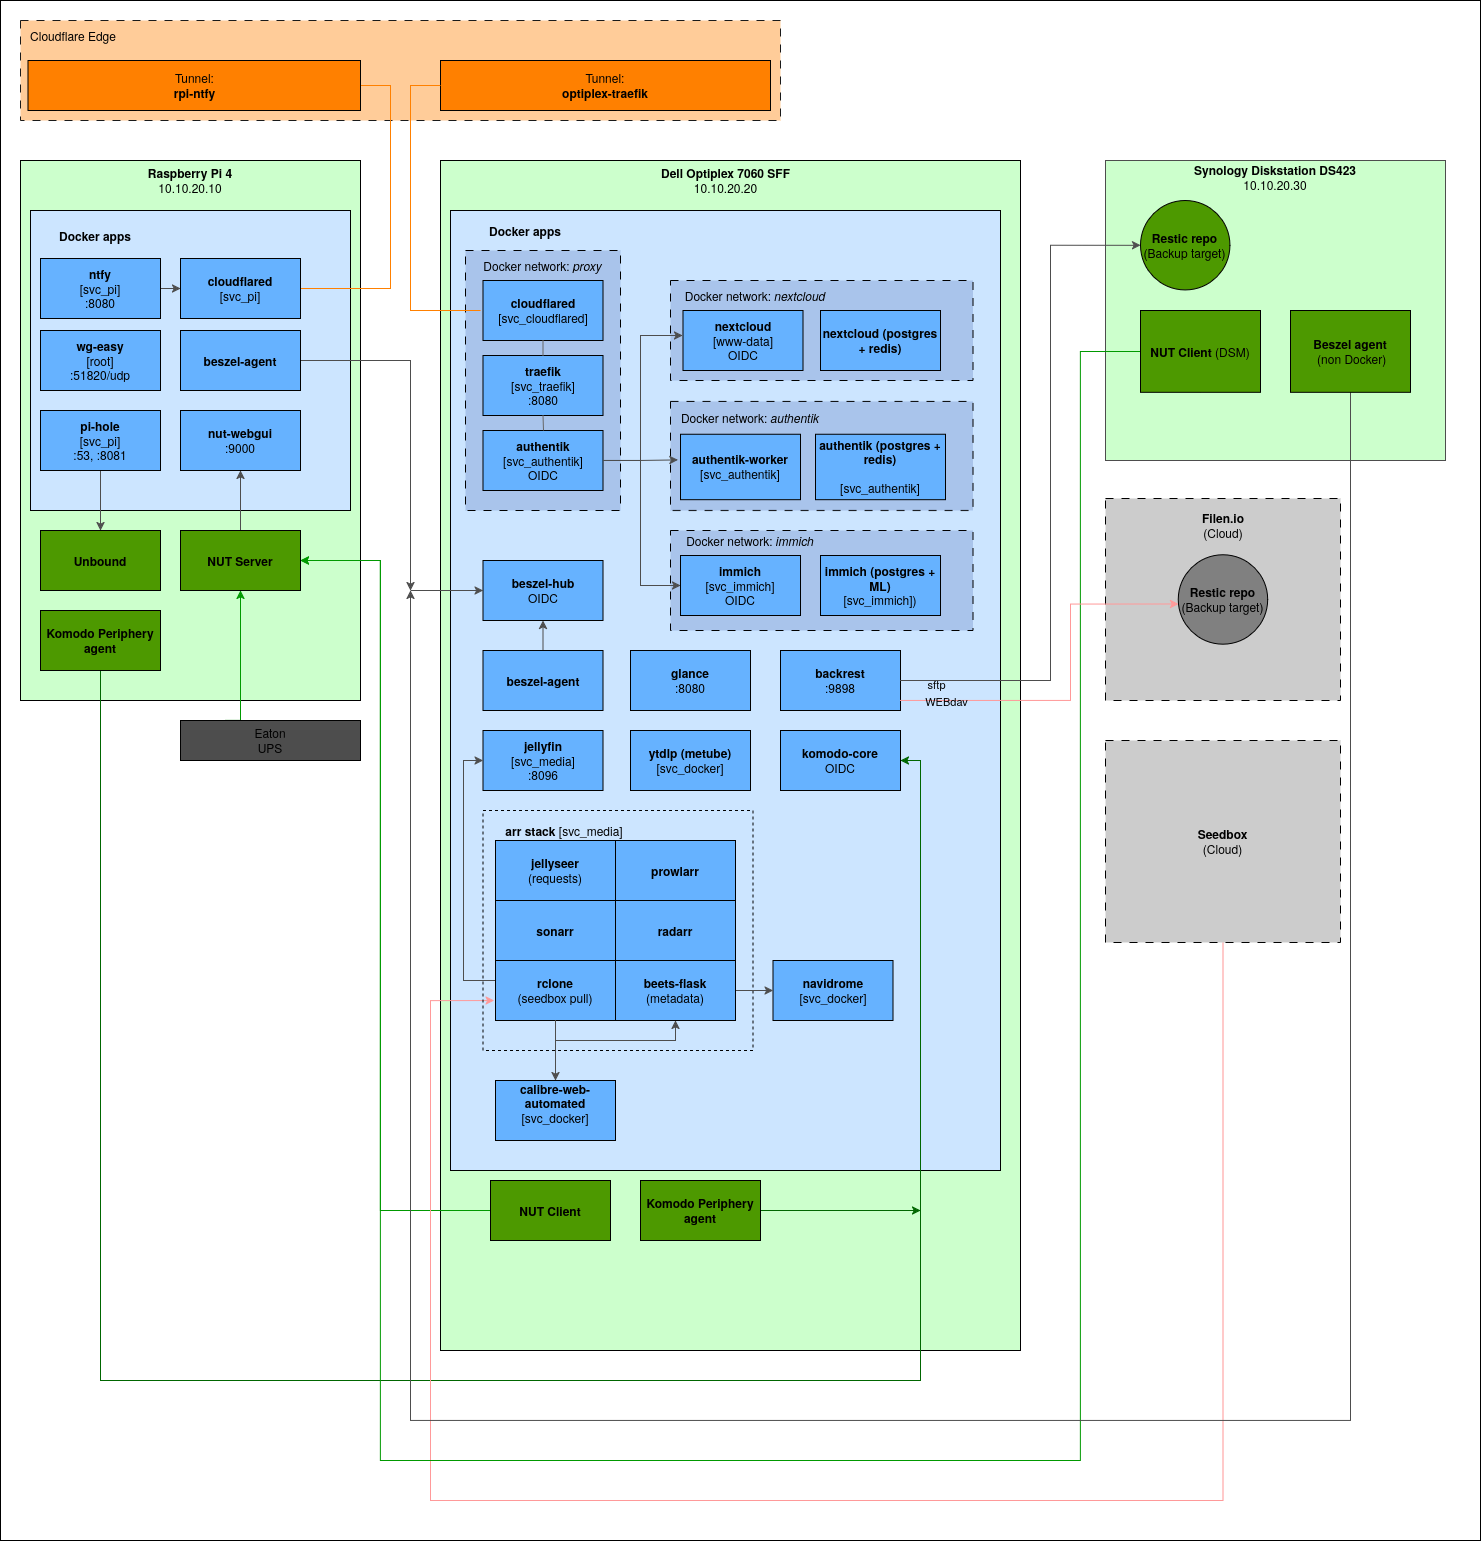
This isn’t perfect but communicates the overall architecture. Some things are omitted - for example Traefik routes the traffic for almost everything on the Optiplex, which is hard to display.
- Light green for physical hosts
- Dark green for regular apps.
- Blue for Docker
- Grey for offsite/cloud
- Orange for Cloudflare
- Arrows to show data flow and connections
Physical / Wiring Map:
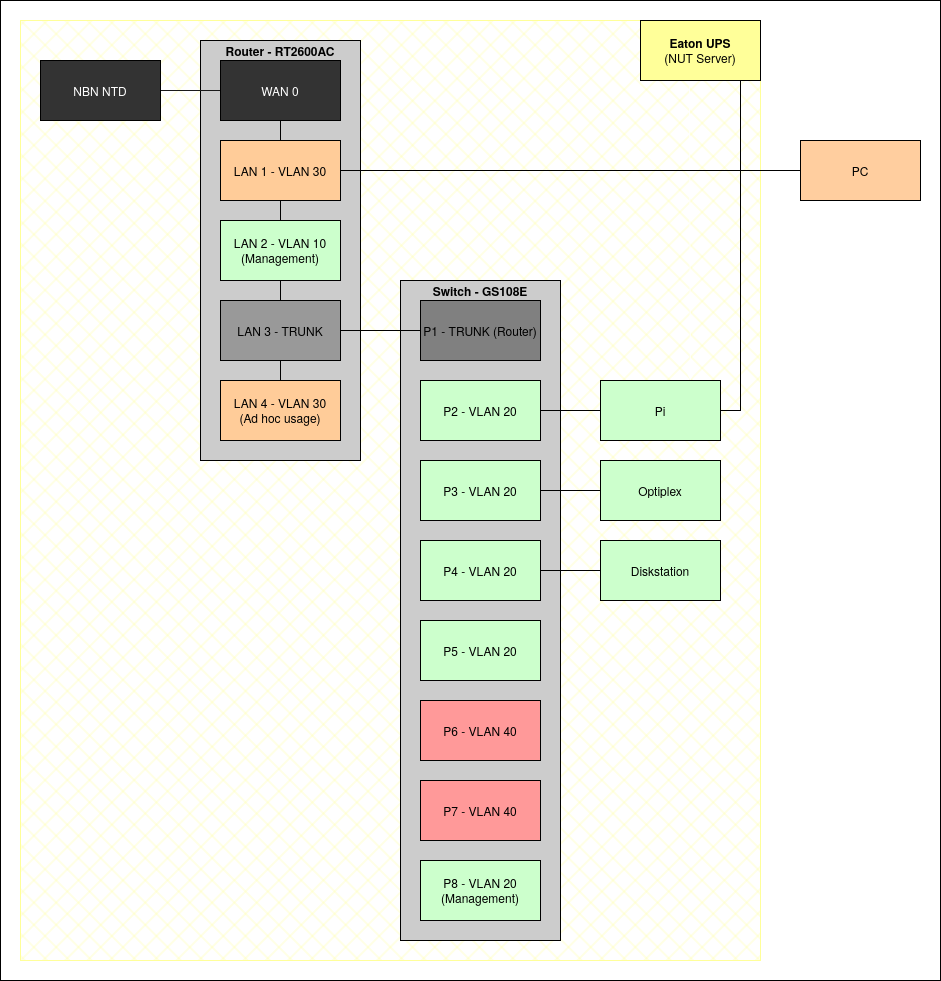
- Yellow cross-hatch denotes devices plugged into the UPS.
- Port colours aligns to VLAN colours above.
Hardware
Quick hardware rundown. A combo of used and new gear, generally aimed at being cost-effective.
Dell Optiplex 7060 SFF:
- RAM: 32GB
- CPU: i5-8600
- Storage:
- 1 TB M.2 NVMe SSD
- 10 TB 3.5" HDD (Seagate IronWolf NAS Pro)
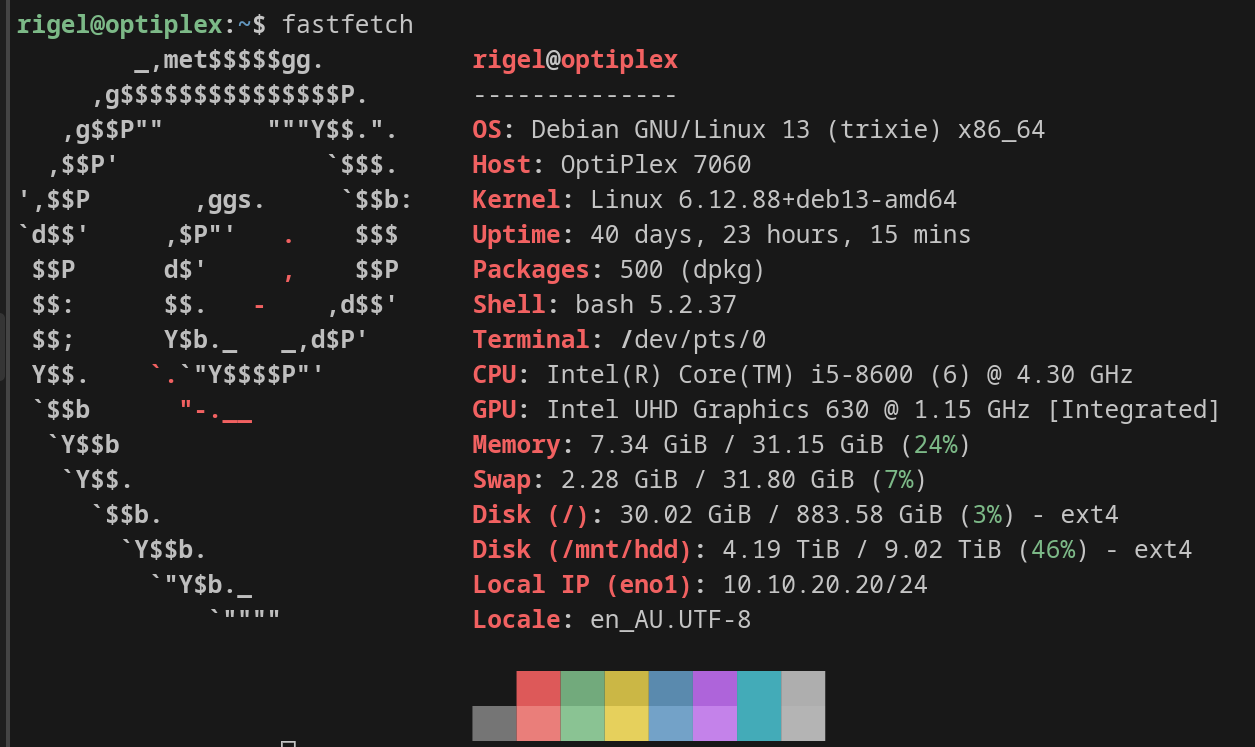
My ‘compute’ server. In my first iteration of my homelab started over a year ago, this was the only device. All other components were added around this. This hosts ‘production’ apps and is the most powerful host. Previously, I ran Ubuntu Server. When I started this rebuild, I nuked it at installed regular old Debian, headless. I’m enjoying the barebones approach.
The HDD I picked up used, for a shockingly good price of $260 AUD on eBay. It passed drive tests with flying colours and even still had some OEM warranty when I picked it up. To this day I don’t know how I scored such a good deal.
Other than that, it has an average M2 NVMe SSD (1TB) and I upgraded the memory to 32GB. My current workload rarely exceeds 8GB RAM utilisation, meaning there is plenty of headroom.
Raspberry Pi 4:
- RAM: 4GB
- Storage: 120GB SATA III SSD, via USB 3.0
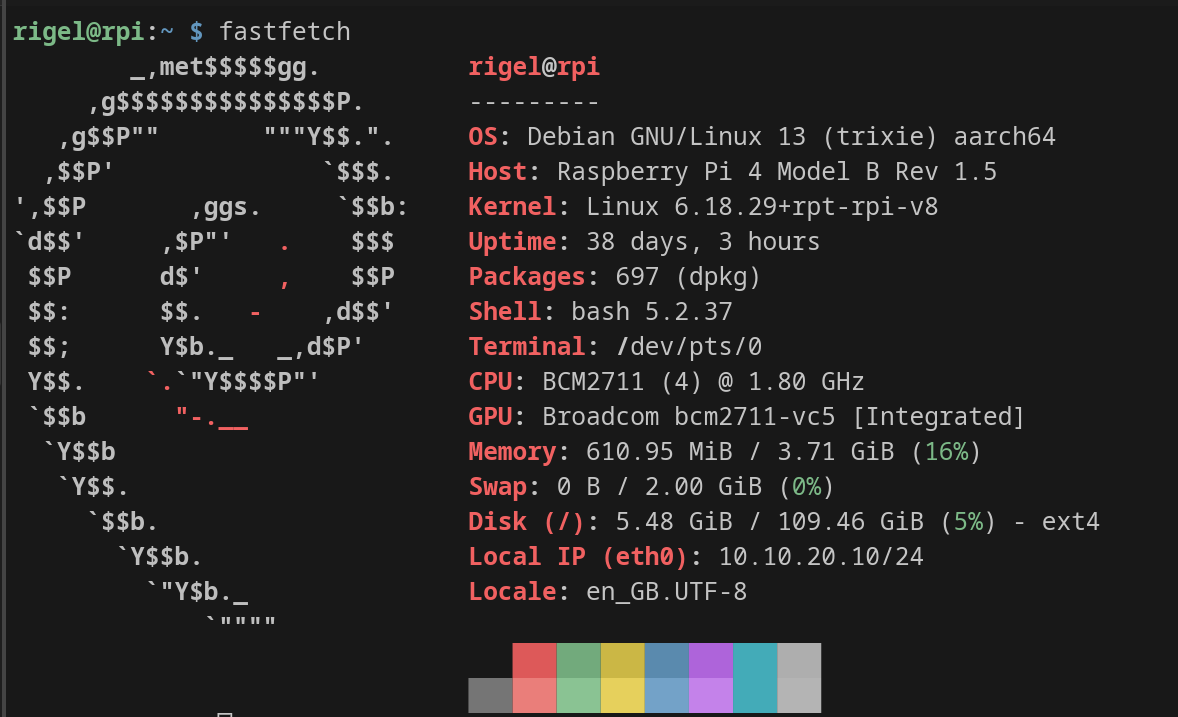
I added the Pi to host a few key use cases that I wanted to segment from the Optiplex. Specifically:
- DNS (ad/tracker blocking + recursive DNS lookups)
- VPN (remote access)
- Network UPS Tools (sending shutdown signal to other homelab devices during outages)
- Notifications for various events
Running Pi Os Lite (basically headless Debian adapted to the Pi), my intention was for the Pi to serve as a bit of a middleman: staying online sipping power during outages and keeping key parts up, segmenting important ‘infrastructure’ or platform-type uses from my ‘prod’ compute uses. If I experience a power outage, after the UPS depletes to 50% capacity, the Pi sends the shutdown signals to other devices, stays online keeping DNS/VPN up, and sending me notifications along the way. The logic here was if I’m lucky enough to retain internet access during a power outage (my router and NBN modem are also plugged into the UPS), I can still keep tabs on things remotely.
The Pi’s main storage SSD is one of Amazon’s cheapest SATA III SSDs (a 120GB Patriot Burst Elite - $50!), in a $20 UGREEN external USB 3.0 SATA III housing (which supports UASP). SD cards are unreliable over extended/constant use, with poorer read/write speeds, and similar in cost for this capacity. A ‘SATA hat’ for the Pi seemed overkill, given USB 3.0 provides acceptable read/write speeds for what the Pi needs to do. This was a reasonable solution and has been working excellently. The Pi itself is enclosed in an aluminium case that acts as a heatsink, providing passive cooling. Following the budget theme, I got the case for < $2 AUD on sale from AliExpress! Winner.
In retrospect, opting for 4GB RAM was overkill here - 2GB would’ve been adequate. As always, the extra headroom is nice to have for the future.
Synology Diskstation DS423:
- RAM: 2GB
- Storage: 10TB 3.5" HDD (Dell HGST)
This unit is a static backup target for local backups - nothing more. It is one of Synology’s cheapest 4-bay units. I umm’d and ahh’d about getting something fancier to ‘future proof’, but this drive gets a daily backup of my data from the Optiplex. It doesn’t host apps. If I need more space, I add more drives. Simple.
I don’t bother with RAID - for now I simply back up the contents of the Optiplex’s 10TB to this one. 2 local copies across 2 devices. If I exceed the need for 10TB storage, I’ll probably throw a bigger drive in the Optiplex and down/up cycle that drive into the NAS (therefore increasing backup capacity).
Keeping the theme, this is also a used HDD (passing SMART with flying colours) and came in at $340. As an ex-datacenter drive, I am hopeful that simple daily backups is an easy retirement for it.
Synology RT2600AC:
Funnily enough, picked up used from an old employer clearing out unused office gear. Great router with a nice UI that does everything it needs to. VLAN tagging. Modern features, automatic security updates. Cannot complain.
NETGEAR GS108E:
8 port managed GbE switch. Supports VLAN tagging via a trunk port. Provides room for future expansion. Nothing fancy, does what it says on the tin.
Eaton 5E Gen 2:
- Power: 1600VA/900W
An uninterruptible power supply (UPS) is a key part of any homelab or server environment. It ensures connected devices receive a steady supply of power throughout black/brown outs, preventing the risk of data corruption or loss.
If a power outage event occurs, Network UPS Tools (NUT) is software that allows you to configure a device (in my case, my Pi) to server as a NUT server, which then sends a signal across the LAN to NUT clients (my Optiplex and NAS) to shutdown gracefully.
I’ve configured NUT such that my devices stay online til the UPS reaches about 50% charge, then a shutdown signal is sent. This ensures my lab isn’t powered down for short outages, while retaining enough juice on the UPS to keep my Pi, router and modem up for a good while. The intention here, as mentioned before, is to keep my VPN + notifications up for as long as possible, so if I’m lucky to retain WAN connectivity during a power outage, I can keep tabs on my homelab remotely. The Pi comes online automatically when it receives power, and I’ve also changed my Optiplex’s BIOS and Diskstation to start when power is received.
My self-hosted notification app, Ntfy, sends push notifications to my phone for different UPS events - such as when the UPS kicks in, power is restored, shutdown signal sent, various errors, etc. More on my Ntfy setup later.
900W is enough power to keep my hardware running at idle for a few hours - more than adequate for my uses.
‘Server rack’:
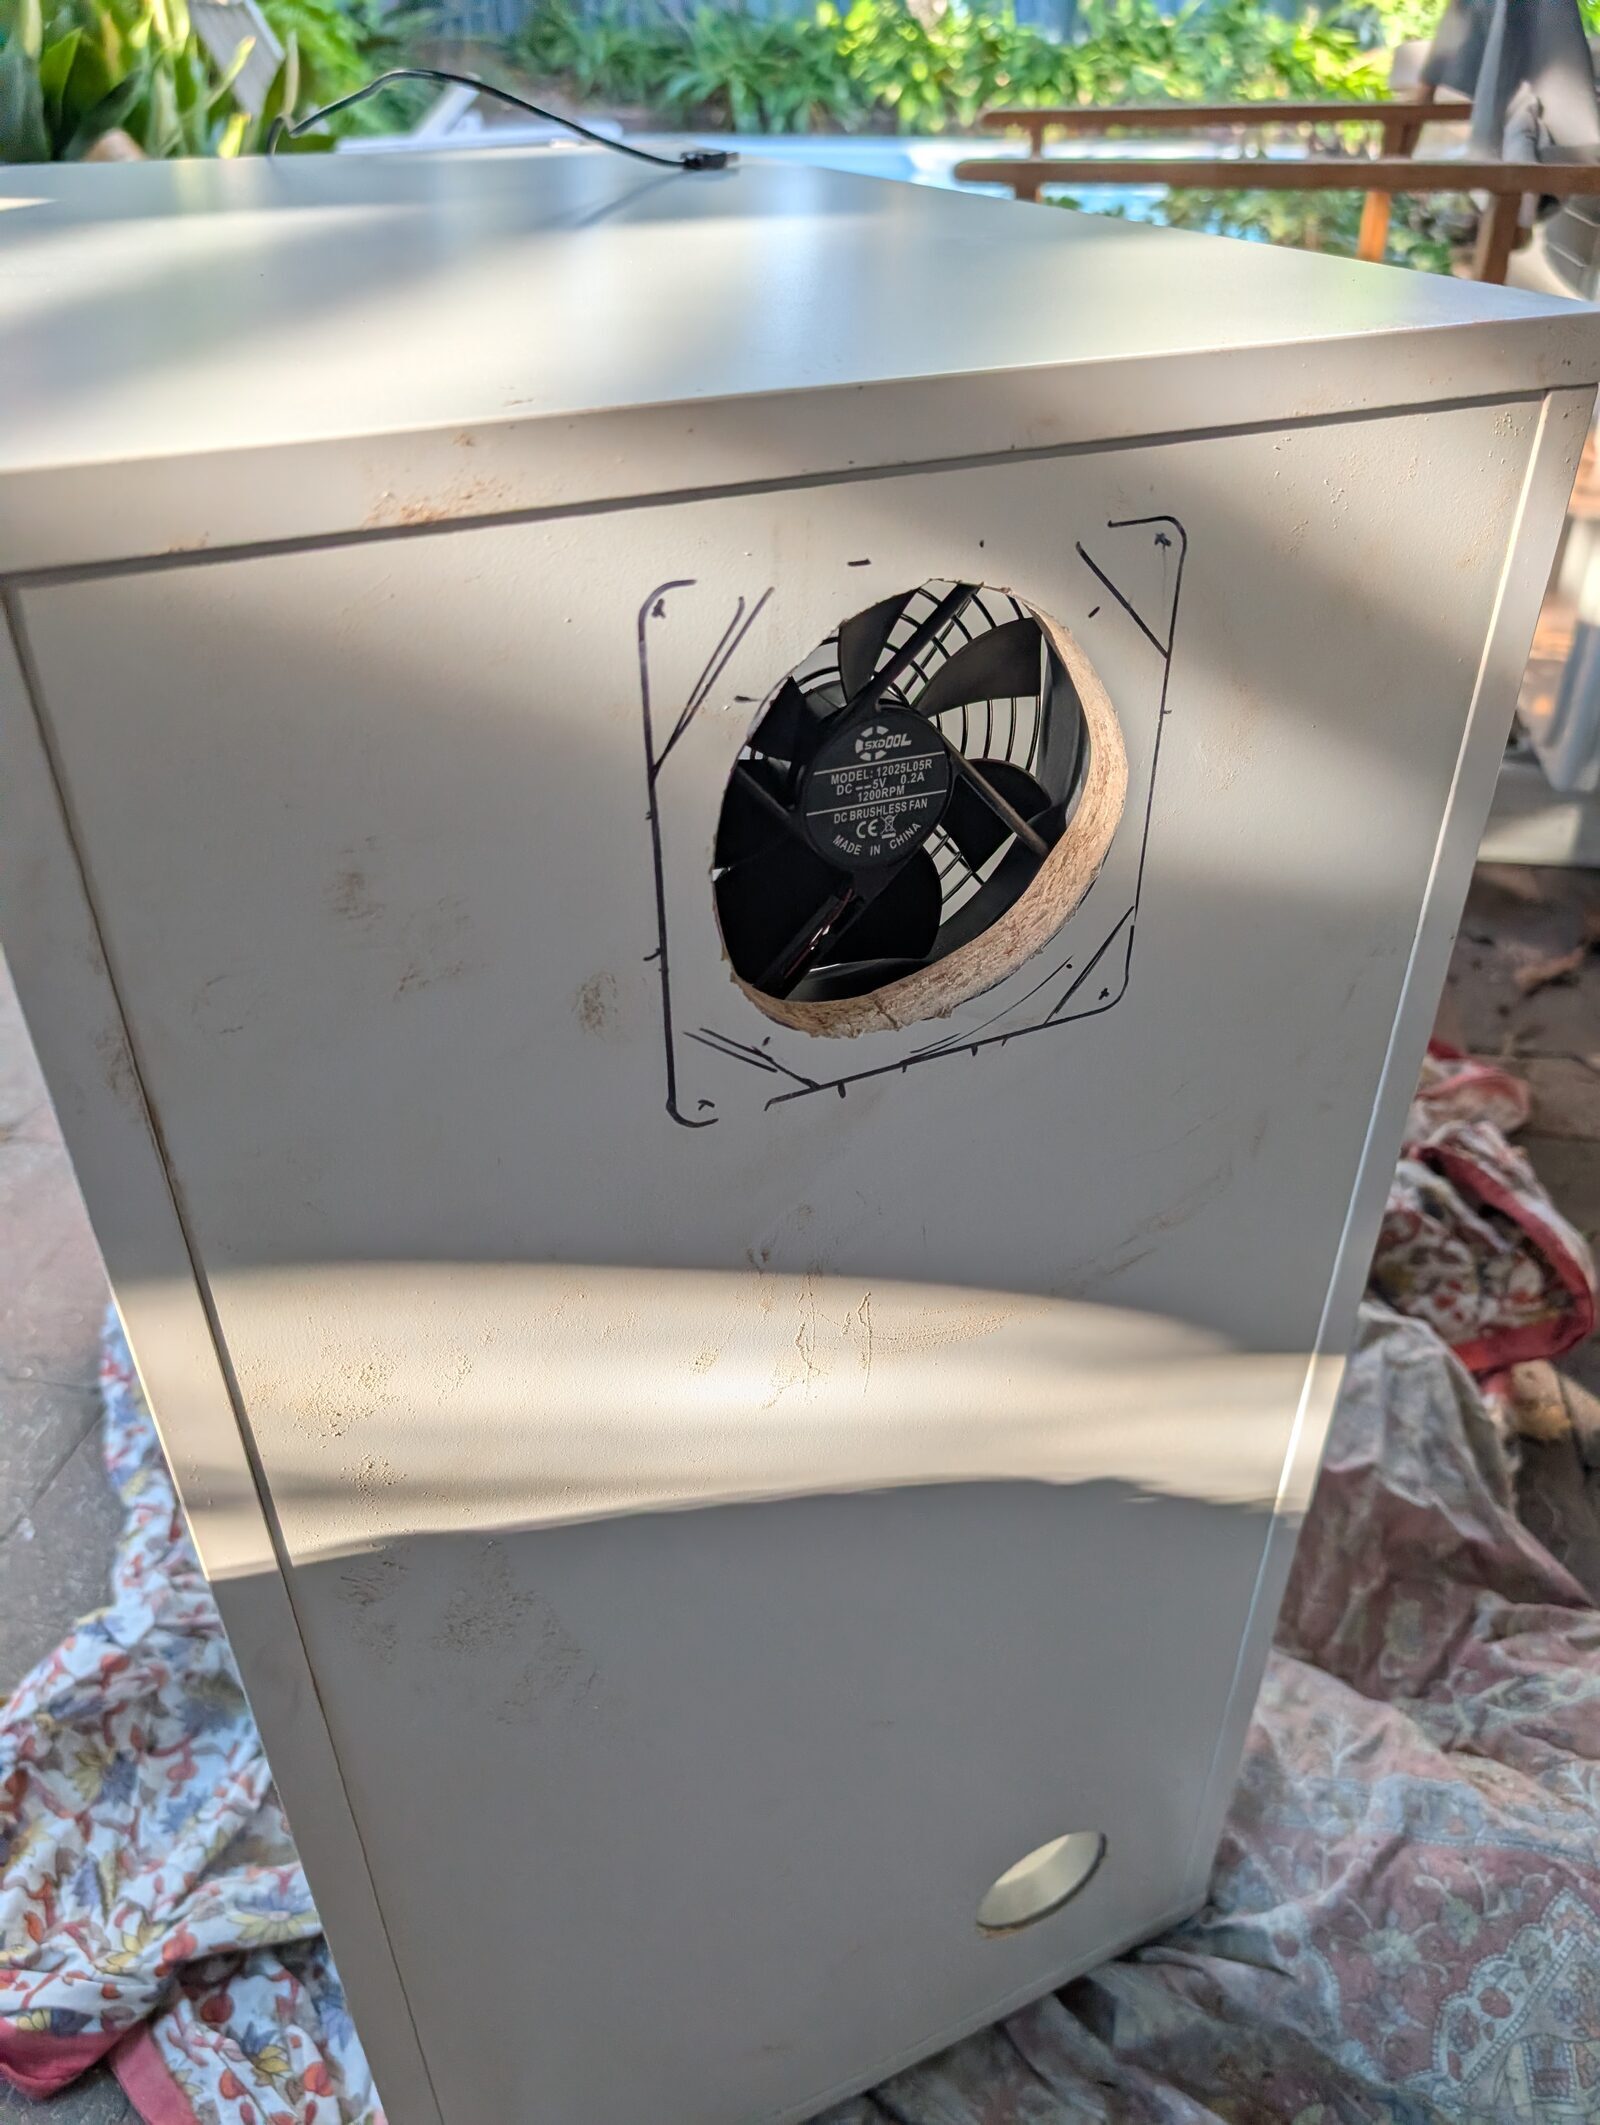
On-brand with a budget build, I repurposed an old Ikea Alex unit to hold the components. Server racks and shelves are expensive and not overly helpful for non rack mount hardware. In about an hour, a few rough jigsaw / holesaw cuts later I added some ventilation with air holes on the shelf, and a cheap 120mm USB fan plugged into the back (powered by the always-on Optiplex) to promote airflow.

Software
Basic hardening
Given the Pi and Optiplex both essentialy run the same OS (PiOS Lite is built on-top of Debian), this process was repeated across both.
- Disable password-based SHH (key-based only).
- Fail2ban (redundant with the above, but doesn’t hurt)
- Unattended-upgrades enabled for Debian and Debian-Security origin packages (ensuring auto-updates for important streams)
- Persistent logging with
journald. The limits below are extremely generous, but potentially useful.- 1 months on Pi, max usage 500MB
- 3 months on Optiplex, max usage 2GB
nftableshost-level firewall configured (plays nicely with Docker). SSH and ICMP (ping) from LAN only, nothing forwarded/open.- LUKS encryption on my storage HDD for the Optiplex, to protect core data in the event of physical theft.
Quick note on LUKS
I didn’t bother with LUKS for the OS/primary SSD for the Optiplex and Pi - it complicates remote restarts and the risk of physical theft is low. Physical theft seems significantly less likely than the chance of needing to reboot remotely. Whereas, personal data on the HDD is genuinely important to ensure is protected if the drive is stolen (docs, photos).
The only real risk here of keeping the OS drives unencrypted is secrets exposed in .env files across my apps - which all pertain to the homelab itself, and would be offline, inaccessible and otherwise unhelpful if the Optiplex is offline due to physical theft.
The Optiplex secondary drive (10TB HDD) can easily be mounted with a command alias I’ve set up and got documented in my repo. This can be run from my laptop or even my phone (using Termux), on LAN or VPN, making a remote restart pretty straight forward.
Git repository & infrastructure-as-code
Below is an extract of the tree for my homelab’s Git repository. For the sake of clarity this is just the first few levels.
├── config
│   ├── nas-ds423
│   │   └── diskstation_20260522.dss
│   ├── router-2600ac
│   │   ├── router_20260521.dss
│   │   └── router_20260528.dss
│   └── switch-gs108e
│       └── GS108Ev4.cfg
├── docs
│   ├── as-built-baseline.md
│   ├── as-built-docker-network-locations.md
│   ├── backup-strategy.md
│   ├── diskstation
│   │   └── config-beszel-agent.md
│   ├── network-topology.md
│   ├── optiplex
│   │   ├── config-arr-stack.md
│   │   ├── config-authentik-app-setup.md
│   │   ├── config-authentik.md
│   │   ├── config-beets-music.md
│   │   ├── config-calibre-web.md
│   │   ├── config-cloudflared.md
│   │   ├── config-immich.md
│   │   ├── config-mnt-hdd-luks-smb.md
│   │   ├── config-navidrome.md
│   │   ├── config-nextcloud.md
│   │   ├── config-traefik.md
│   │   └── config-traefik-new-service-setup.md
│   ├── rpi
│   │   ├── config-komodo-periphery.md
│   │   ├── config-ntfy.md
│   │   ├── config-pihole-unbound.md
│   │   ├── config-ups-nut.md
│   │   └── ntfy-backrest-hook-commands.md
│   ├── svc-account-docker-permissions.md
│   ├── svc-roles-chown.md
│   └── svc-uid-gid-mapping.md
├── hosts
│   ├── optiplex
│   │   ├── docker
│   │   │   ├── arr
│   │   │   ├── authentik
│   │   │   ├── backrest
│   │   │   ├── beszel
│   │   │   ├── calibre-web
│   │   │   ├── cloudflared
│   │   │   ├── glance
│   │   │   ├── immich
│   │   │   ├── jellyfin
│   │   │   ├── komodo
│   │   │   ├── navidrome
│   │   │   ├── nextcloud
│   │   │   ├── subtrack
│   │   │   ├── traefik
│   │   │   └── ytdl
│   │   ├── scripts
│   │   │   ├── hdd-lock.sh
│   │   │   ├── hdd-unlock.sh
│   │   │   ├── nextcloud-db-dump.sh
│   │   │   └── systemd
│   │   └── system
│   │       └── nftables.conf
│   └── rpi
│       ├── config
│       │   └── komodo
│       ├── docker
│       │   ├── beszel-agent
│       │   ├── glance
│       │   ├── ntfy
│       │   ├── nut-webgui
│       │   ├── pihole-unbound
│       │   └── wg-easy
│       └── scripts
│           └── ntfy-nut.sh
└── readme.md
At the root level, we have:
config- Predominantly config files exported from hardware (without secrets)
docs- Documentation of design decisions, important processes, and host/app specific items.
- Having ‘documentation-as-code’ has made for easy agentic coding as all context and relevant info is available within the repo.
hosts- Host-specific subfolders, containing Docker stacks and system scripts.
- Each host gets a sparse checkout of their respective sub-folder only.
This keeps things organised, controlled and ready to redeploy and rebuild easily. It also makes working on a dev workstation, like my personal laptop, much easier. There is far less of a need to edit docker-compose.yml files on a given server directly, though sometimes for quick changes this is easier.
Docker apps
Overall a fairly generic homelab stack. I’ll touch on a few honourable mentions.
Glance:
Dead simple static homepage. I wanted to keep this minimal and decluttered. If I need details, I will go into a given tool.
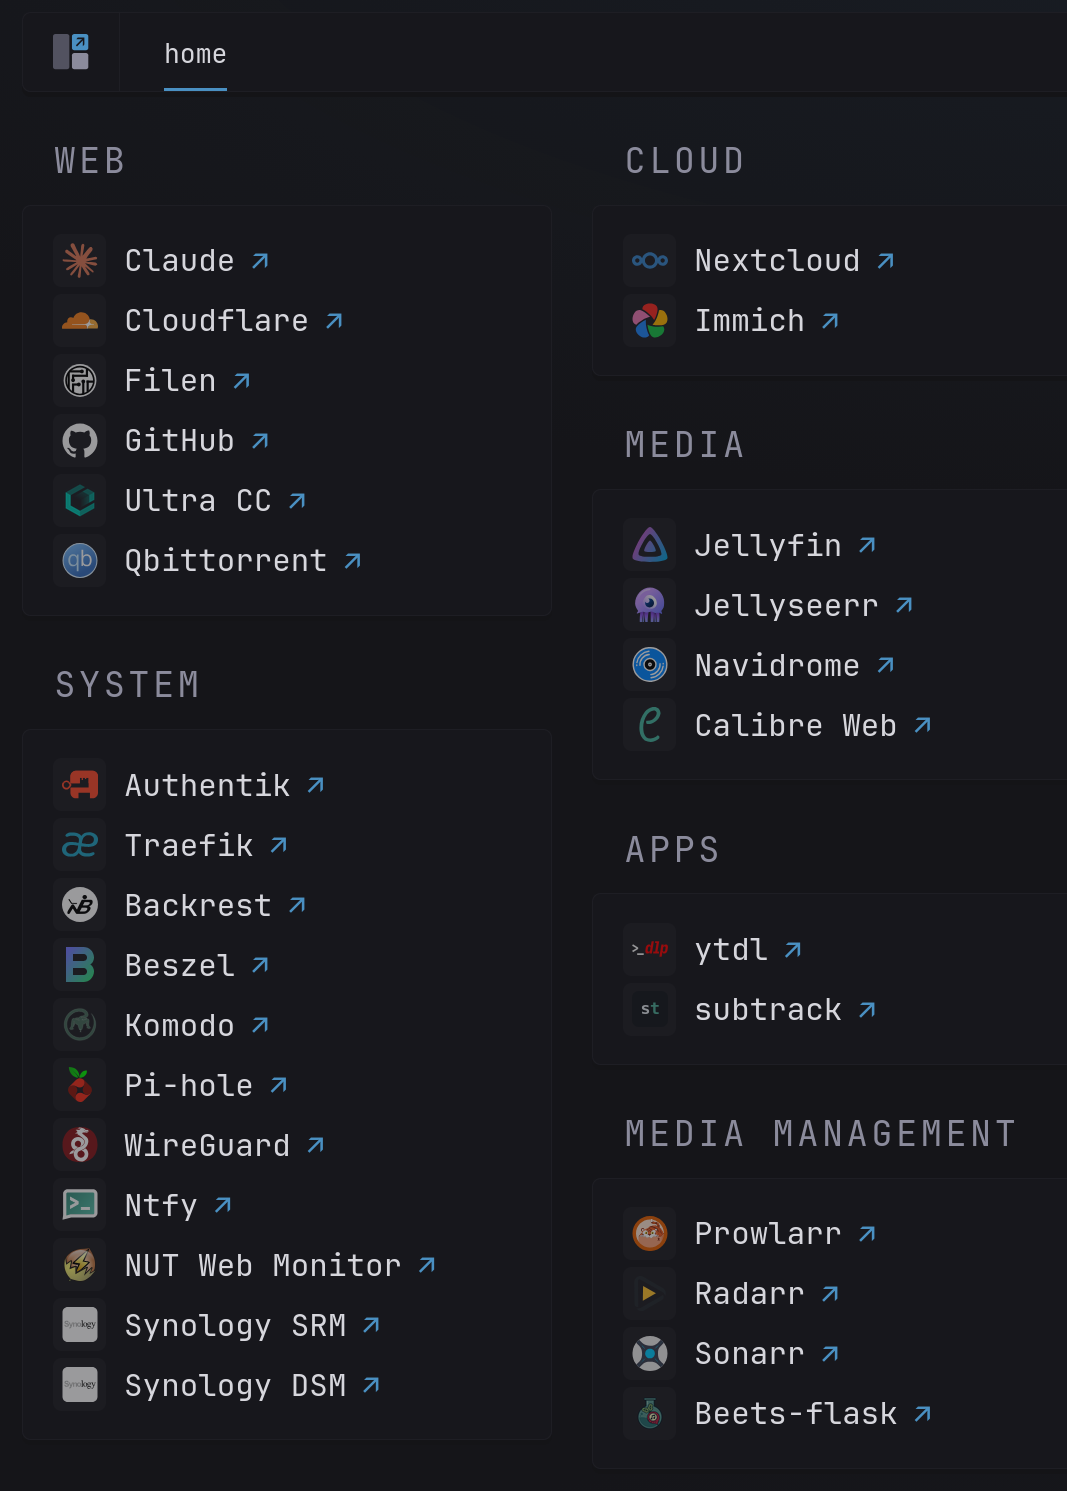
Currently runs on the Optiplex, though I made a second Glance page to run on the Pi for Pi specific apps, in case the Optiplex is down during an outage and I need quick access.
Pi-hole + Unbound:
It’s not a homelab without Pi-hole. Network level ad-blocking is a game changer and there are significant privacy benefits to the trackers it cuts out too. I use one of Hagezi’s blocklists. I segmented this onto a separate device to ensure high availability of DNS across my LAN in case my Optiplex goes down for some reasom.
Pi-hole has also been configured to route all traffic to my own domain directly to Traefik, for routing directly to the relevant app, keeping it LAN only. This bypasses the need for stuff to ’leave’ my LAN if it doesn’t strictly need to.
Having used Pi-hole previously, this time I took it a step farther and combined it with Unbound. Unbound is a recursive DNS resolver. Essentially, Unbound does it’s own DNS lookups and builds it’s own cache, rather than relying on upstream providers.
While Pi-hole blocks ads/trackers on known blocklists, it still relies on your upstream DNS provider to resolve the name for your other web activity that isn’t on a blocklist. Your upstream DNS provider can still see everything you’re querying beyond this. Unbound solves this, by going to the root servers, then the TLD servers, then the domain’s authoritative nameservers. With QNAME minimisation each server in the chain only sees a portion of it, so no entity upstream gets a full profile on your browsing. DNSSEC also validates it cryptographically, ensuring results are untampered. The net outcome of this instead of DNS providers like Cloudflare 1.1.1.1 or Google 8.8.8.8, seeing everything you do, they can only see a portion.
Performance with Unbound has been solid. Had a few weird issues with Meta CDNs struggling to load content. A bit of minor tinkering seemed to mostly resolve this. Though considering this is mainly effected Instagram Reels, I am not overly concerned and it’s probably a good thing to introduce friction to endless doomscrolling.
Backrest:
Backrest is a GUI client for restic backups. Restic, being a CLI only interface, has a steeper learning curve compared to user-friendly tools like Duplicati and Kopia. Backrest is a nice middle ground - the lightweight simplicity of Restic, with an interface to configure, review and restore.
My backup strategy is straightforward:
- Encrypted daily snapshot of Optiplex HDD to my NAS HDD via SFTP
- Excludes: less important media files (movies, TV shows, music)
- Encrypted twice weekly snapshot of aforementioned media files via SFTP
- Encrypted daily snapshot of specified ‘crown jewels’ to Filen (zero knowledge cloud storage provider), via WebDAV, Rclone and filen/cli.
- Excludes: data heavy stuff like bulk raw 4K footage from my action cams, aforementioned media, etc.
Restic repository prunes (deleting old snapshots) occur weekly per repo. Restic repository checks (validating checksum for integrity to mitiggate data loss) occur monthly for each Restic repo.
During the backup process, Restic encrypts everything before it leaves the machine (AES-256), ensuring only ciphertext crosses the network. The local copy travels via SFTP, the cloud copy goes to Filen which encrypts it again as part of it’s upload process. This gives me two local copies (one live on the LUKS-encrypted HDD, another in the NAS Restic repo) and a third offsite with Filen - an classic 3-2-1 backup.
Beszel:
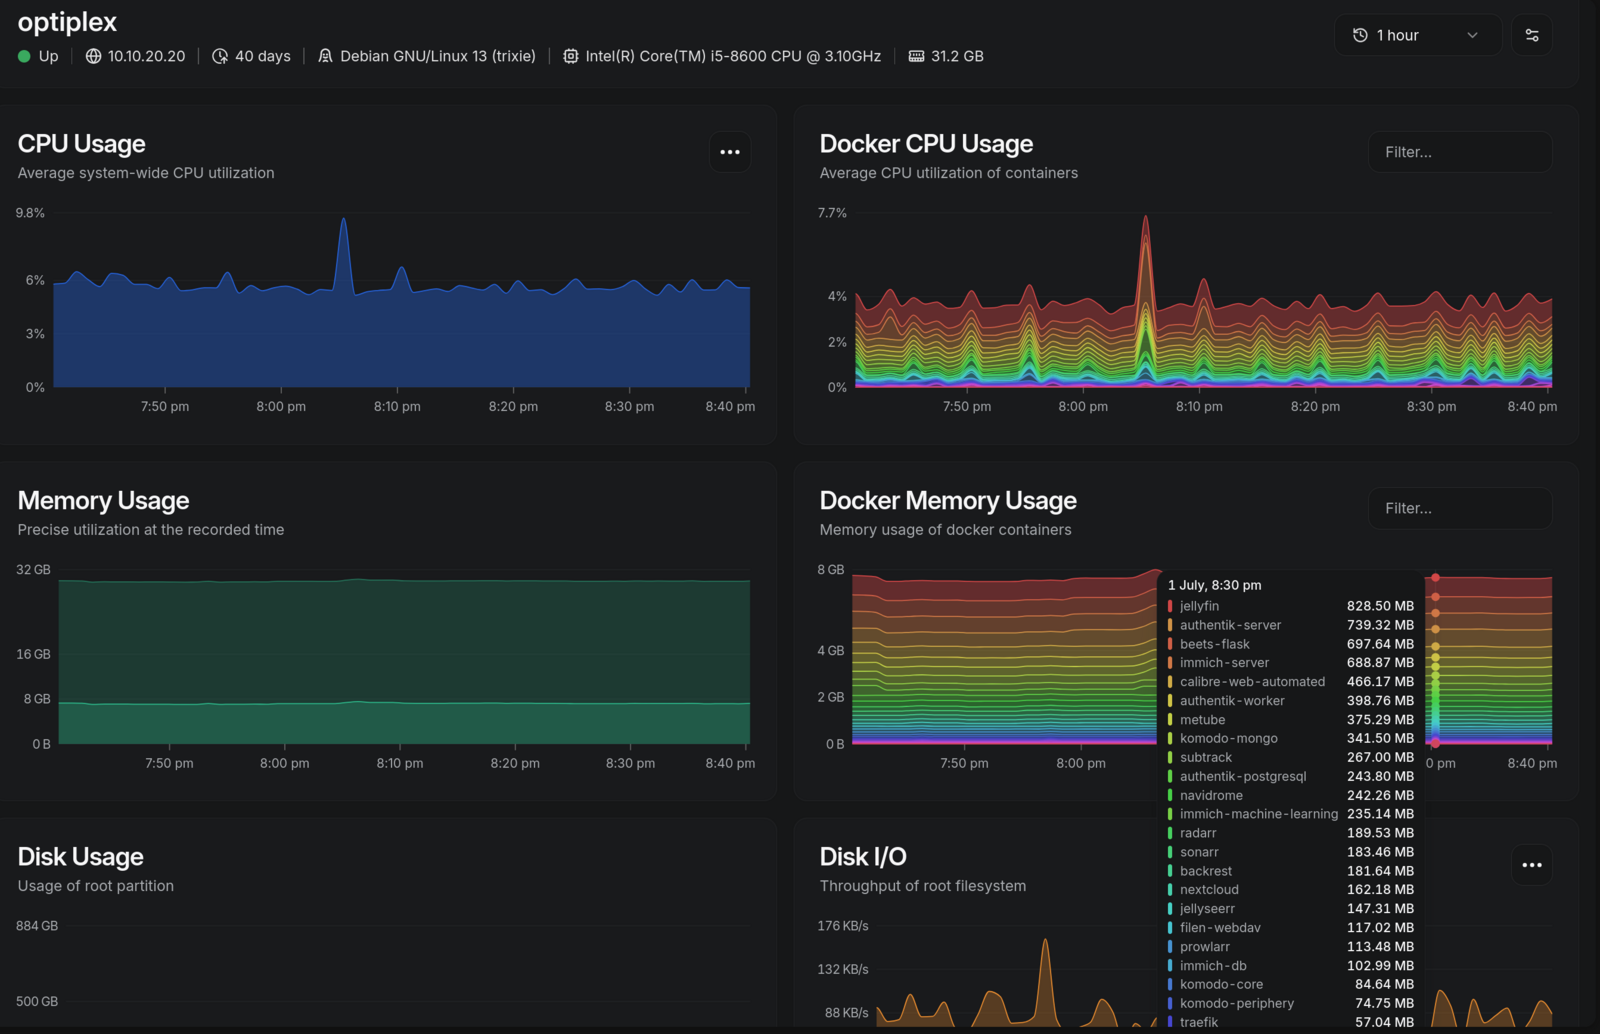
Beszel is a lightweight app for monitoring system utilisation, providing insight per Docker container also. Managed to install agents on all my devices (the Diskstation running Synology DSM was a slightly convoluted process). Opted against a heavier Promethus/Node Exporter/Grafana set up in favour of simplicity.
The data below (and more) can be viewed individually for each device running a Beszel agent.
Komodo:
GUI app for managing containers. I have used Portainer previously and wanted to try Komodo. TBH - I have learned how to quickly grab container logs via CLI over SSH and find this easier some times, but it’s a good option to have.
I haven’t made good use of Komodos native Git features, instead opting to manage my repo manually (and perhaps unlearn a couple years of bad habits using GitHub Desktop LOL).
Beets-flask / Navidrome:
My ‘arr’ stack for TV and movies is pretty straight forward and much like what you can find elsewhere on the web. I did whip up something more bespoke for managing my music library.
Music metadata tagging can be fickle and frustrating. Unlike TV and movies, automated approaches to tagging music don’t seem to be quite there yet for ‘hands free’ / total automation. I am fussy about my music library and prefer to prefer to retain manual oversight. After some digging, Beets-flask is a tool with a small following that seemed to fit my use cases my uses well. It required a lot of config to get working right.
The process is as follows:
- Running on a cron, Rclone periodically pulls from my ‘cloud server’ into Beets-flask’s processing/watch directory on my Optiplex.
- As part of the above cron, Ntfy sends push notification telling me something is ready for review
- I enter Beets-flask, review/handle the metadata tagging myself, and once completed it imports into my Navidrome library
- Navidrome picks up the new media for streaming via it’s web GUI, the Feishin Linux desktop app or Symfonium on my Android phone.
- Ad-hoc manual tagging is done the old fashioned way: copy to my laptop via SMB, fix with MusicBrainz Picard and replace on the server library.
wg-easy (Wireguard):
wg-easy is a simple GUI to manage Wireguard VPN. Allows you to configure clients easily. This was preferable to more complex solutions like Tailscale, which isn’t open source. Tailscale has other benefits, but not for my uses.
Much like Pi-hole/Unbound, this is running on my Pi to ensure high availability and no issues with remote access if my ‘prod’ server goes down for some reason.
Securing WAN exposed services
Fronting any service to the public internet is daunting for a homelabber - and rightfully so. Many self-hosted apps are not designed with security at front of mind. The consequences of getting it wrong are real.
Port-forwarding creates attack surface and essentially lets the world know that you have stuff sitting on your public IP. This can be an acceptable risk, but it does create attack surface and an accompanying maintenance burden.
The only port I needed to forward was the Wireguard port, to create a VPN for remote access. Wireguard silently drops packets that do not correspond to a known host, so it is low risk to expose.
I opted to keep the majority of my apps LAN only and just access them over VPN where remote usage is needed. This simplifies things tremendously. However, some apps that I wanted to be able to rely on
In the future, I will likely need to port-forward some video game servers like a Minecraft or Valheim server. These servers are strictly for usage with friends - not for public use - and are player username allow-listed or password protected. I also plan to segment these onto a separate physical device sat within VLAN 40 (Untrusted), meaning there is little risk posed to my core ‘production’ apps / important use cases in the event something bad happens.
Cloudflare Tunnels
I chose to minimise port-forwarding where possible and instead rely on Cloudflare Tunnels. Cloudflare is my domain provider and has a fairly powerful suite of tools available within it’s platform, at no additional cost if you register your domain with them. They also happen to be an affordable domain registrar.
Using a Cloudflare Tunnel dramatically reduces attack-surface, by creating an additional trust boundary outside my homelab at Cloudflare’s edge node. Using Cloudflare’s WAF, even on the free tier I have the ability to make 5 WAF rules and a rate-limiting rule. This shifts the burden of blocking noisy auth attempts to Cloudfare, and off my own network altogether.
For my entire domain, essentially:
- Block all non-Australian traffic (this alone cuts out 95% of the noise)
- Block all traffic belonging to a known or likely bot
- Rate limiting rule for Nextcloud’s login page
- Block all known admin paths for Ntfy
! Privacy trade off ! There’s an important privacy trade-off here to note. Cloudflare Tunnels encryption ends at the Cloudflare edge and is unencrypted between the edge and your machine running the tunnel. In theory, Cloudflare can see all packets passing through your tunnel at it’s edge, and therefore hypothetically capture/ recreate anything. Significant.
Short of any Five Eyes silly business, I was prepared to accept this as a drawback for the benefits provided by Cloudflare. I rationalise this trade off with the fact Cloudflare is not a data / advertising company - they are infrastructure providers. While they are still ‘big tech’, they have a reasonable track record for ethics (particularly with their honest domain registration and renewal pricing), and as a result I consider them to be much more privacy respecting than something like Google, which is fundamentally a data company and targets you based on your usage within their platform.
Furthermore, I can mitigate this trade off entirely using application layer encryption. For example, my Obsidian vault (note taking app) uses the Remotely Save plugin for sync between devices, which E2E encrypts my notes for sync via Nextcloud. For truly sensitive files to put on Nextcloud, I have also created a E2EE Cryptomator vault on my laptop, which is synced using Nextcloud’s desktop client. This means I have a pathway for E2EE for both my notes and files.
Finally, all of this is also only relevant when I am not on my home LAN. My Pi-hole is configured to route traffic to my domain within the LAN directly via Traefik, rather than going out and back into Cloudflare’s edge via the tunnel. 95% of my homelab usage is at home, so not a big deal in my opinion.
While a large part of homelabbing is all about self-reliance, self-hosting, privacy, and avoiding third parties, this is a trade off that makes sense to me. Shifting the bulk of the trust equation to someone else’s infrastructure with enhanced security functionality (WAF rules and rate limiting), it’s is a value-add, with a small compromise - not a major negative.
Ntfy:
Ntfy allows you to configure push notifications for basically anything. I am using it for backup jobs (completing successfully, failing, errors, etc.), UPS events (power outages, devices being automatically shutdown), and ‘Arr’ stack events like when media is ready for viewing. It really is a great way to gain visibility over events in your homelab.
Unfortunately Ntfy is a barebones service with very little in terms of built in security or authentication. This is simplicity by-design, but it does make it tricky to secure.
Crucially, I wanted to receive notifications when I am outside of my LAN. Getting notified of a power outage when I am not home is useful. So is knowing I’ve got a TV shown or movie ready to watch while I am out walking the dog. But more importantly, if my backups fail while I am away, say while travelling, I want to know about it to reduce the chances of data loss.
This meant a bit of a Frankenstein solution was needed, balancing WAN connectivity and usability, with attack surface and risk.
My Ntfy server sits on a dedicated sub-domain via a Cloudflare Tunnel, providing it WAN connectivity to be able to send me notifications wherever. Without this, notifications never leave my LAN. However, the entire web UI is disabled (in addition to other admin settings), reducing attack surface. Cloudflare WAF rules also block access to anyone attempting to access the (disabled) login page, so enumeration from Cloudflare’s edge never reaches the Pi.
Authentik:
Before exposing actual ‘production’ apps to the wider internet, I wanted to ensure there was a robust way to enforce MFA and other policies. Authentik is an identity provider that has enough chops for some commercial use, and is damn near overkill for my homelab. Using it gave me a sense of appreciation for my IAM colleagues as I realised the granular detail required to implement secure authentication flows that work as you intend.
For apps that support it, I use Authentik for OIDC. This means it is one set of creds, one token, one of access policies to configure, with the authentication to OIDC apps being outsourced to Authentik and flowing freely for the duration of the session. Not only convenient, but also secure. For a few LAN only apps that don’t support OIDC, I kept local auth as it isn’t that inconvenient. Using generic forward-auth (where Authentik just sits in front of an app, rather than neatly interfacing with it’s authentication system, typically has other tradeoffs that would be a net-negative.
To support production apps fronted to the internet, Authenitk also needs to sit on the public internet. This is what it’s designed for and was easy with a Cloudflare Tunnel, though I did configure a few custom polices:
- Default enforce MFA enrollment for new user
- Default enforce MFA for all authentications
- Admin account access via trusted VLAN or VPN only
- Drop MFA requirement on trusted VLAN or VPN for standard users
This keeps things convenient when I am at home - MFA all the time at home on LAN is annoying and frankly not needed - I know exactly what devices are on my trusted VLAN and VPN. Guest users and untrustworthy/riskier devices go on a different VLAN.
Otherwise, MFA on WAN is required, and admin access (for config etc.) always requires MFA and must be on the trusted VLAN or via VPN.
Where auth is not passed, access to any of my apps (detailed below) fails at Authentik and doesn’t get further to the relevant applications.
Traefik:
Traefik is a reverse proxy that works excellently with Docker and a Git-oriented ‘infrastructure-as-code’ approach. It also integrates nicely with Authentik. I’ve previously used Nginx Proxy Manager and while it worked, it was a little cumbersome for the reasons I initially liked it: GUI driven config.
Traefik is better suited for infrastructure-as-code, Git-ops and agentic development. Traefik matches requests to a router by hostname (subdomain.mydomain.com), optionally runs it through middlewares like security headers, Authentik auth, or rate limiting, then forwards it to the server. Routes are YAML, stored as code in Git. I opted to use the file provider, not the Docker socket, which means I need to manually declare things (rather than letting Traefik find it automatically), but Traefik stays unprivileged. It also handles certificates and encryption for the domain and any sub domains.
Here’s an example of the config of my Traefik sub-directory from the repo, which is at hosts/optiplex/docker/traefik:
traefik/
├── config
│   ├── auth
│   │   └── users.example
│   ├── dynamic
│   │   ├── authentik.yml
│   │   ├── backrest.yml
│   │   ├── beszel.yml
│   │   ├── calibre-web.yml
│   │   ├── dashboard.yml
│   │   ├── glance.yml
│   │   ├── immich.yml
│   │   ├── jellyfin.yml
│   │   ├── jellyseerr.yml
│   │   ├── komodo.yml
│   │   ├── middlewares.yml
│   │   ├── navidrome.yml
│   │   ├── nextcloud.yml
│   │   ├── nut.yml
│   │   └── ytdl.yml
│   ├── examples
│   │   └── service.yml.example
│   └── traefik.yml
└── docker-compose.yml
NextCloud & Immich:
These apps are the core, day-to-day functional apps in my stack. They are both configured similarly. OIDC auth via Authentik, fronted via their own subdomain via a shared Cloudflare Tunnel.
NextCloud is a cloud storage platform, similar to Google Drive in functionality. Immich is almost an exact clone of Google Photos. Both work excellently and I do not miss their Google counterparts.
The justification for exposing both of these boiled down to user friendliness. Needing to toggling on VPN to sync photos to Immich while travelling, or quickly access a document is fiddly. As I gradually migrate from Google Photos, I didn’t want to introduce more friction for basic functionality. This becomes even more true in the future, if less tech savvy family members use my Immich instance. They shouldn’t need to play silly games with toggling VPNs to do what iCloud or Google Photos does without complaint.
Furthermore, Nextcloud’s WebDAV server is the remote sync target for my Obsidian vault. For notes from my phone to sync cleanly, it should be publicly reachable for the same reasons.
Network
This will naturally have some overlap with the above. As mentioned earlier:
- Pi-hole is configured to route traffic to my domain via LAN where possible
- Wireguard is the only publicly forwarded port, otherwise using Cloudflare Tunnels.
VLANs
VLANs are a way to logically separate networks within your LAN. This is important for separating use cases, creating trust boundaries and controlling traffic within your network.
I DHCP-reserved relevant devices like my servers, PCs and smart TV to make managing traffic feasible. I also swapped to a 10.X.X.X addressing system. I’ve previously run into issues while travelling using defualt 192.168.X.X addressing when accessing my homelab remotely via VPN. Plus, 10.X.X.X is easier to type and remember and just looks cleaner.
My Synology RT2600AC router has support for up to 5 VLANs, including 1 default management VLAN and 1 default guest VLAN. By default, inter-VLAN communication is usually blocked. Therefore, I needed to punch through a few holes to support basic functionality
The VLAN firewall rules are essentially:
- Allow: All LAN traffic –> Pi-hole DNS (10.10.20.10:53)
- Purpose: enables everything to use Pi-hole DNS
- Allow: Trusted devices traffic –> Servers
- Purpose: enables ‘dev’ work and remote access to servers from trusted devices like my laptop, desktop PC and phone
- Allow: Smart TV –> Jellyfin instance (10.10.20.20:8096)
- Purpose: enables my smart TV to access Jellyfin over LAN for streaming
- Deny: Untrusted –> LAN
- Deny: All inter-VLAN traffic
The last 2 are potentially redundant, but there is no harm adding them in as they ensure all traffic should match on something and block by default.
VLAN 10: Management
- Subnet: 10.10.10.0/24
- DNS: 9.9.9.9
- WiFi SSID: Hidden
Usage:
- Management (config) purposes only. Can serve as a backup WiFi AP if having DNS issues.
- DNS set to Quad 9 to ensure my router can get access to firmware/auto updates if my Pi-hole ever has issues. Quad 9 is ‘good enough’ privacy for this.
VLAN 20: Servers
- Subnet: 10.10.20.0/24
- DNS: 10.10.20.10 (Pi-hole)
- SSID: None (Ethernet only)
Usage:
- Servers only - Optiplex, Pi, Diskstation
VLAN 30: Trusted
- Subnet: 10.10.30.0/24
- DNS: 10.10.20.10 (Pi-hole)
- SSID: Visible (Dynamic/multi-band 2.4/5GHz)
Usage:
- Daily use of trusted personal devices, like my laptop(s) desktop PC, phone, etc.
VLAN 40: Guest Network (Untrusted)
- Subnet: 10.10.40.0/24
- DNS: 10.10.20.10 (Pi-hole)
- WiFi SSID: Visible, 2.4GHz
Usage:
- Guest devices
- Untrusted devices: smart TV, printer, etc.
- Future usage: separate server running publicly exposed / port forwarded Minecraft server
VLAN 50: Work
- Subnet: 10.10.50.0/24
- DNS: 1.1.1.1 (Cloudflare)
- WiFi SSID: Hidden, 5GHz
Usage:
- Work laptop only. Deliberately segmented from everything else.
- DNS set to standard Cloudflare for raw, maximum performance. Do not want my homelab set up interfering with my ability to produce income. Highly likely that corporate VPN enforces different DNS anyways, but the principle is there.
Future projects
For next steps, there’s a few contenders that come to mind:
1: SIEM + ‘cyber range’
As a detection engineer by trade, this is a no brainer for brushing up on the basics and learning new skills. It may require some new hardware to do properly. The gist:
- Self-host an Elastic fleet server on a ProxMox host, deploy agents across my homelab and build in some security monitoring capabilities
- Shuffle workflows to send me Ntfy notifications when alerts trigger
- Create playbooks for spinning up test machines and enrolling in SIEM agents
- Use test machines to simulate TTPs and sandbox detection ideas
- Experiment with Terraform/Ansible playbooks for automatically spinning up test VMs and enrolling agents
2: AI LLM stack
Anthropic’s idea of age verifying Claude users doesn’t sit well with me. I started looking at alternatives and seeing exactly what could be self-hosted without needing to buy an expensive GPU for my own inference. The framework would be something like:
- Self-host OpenWebUI for a chat-interface and using OpenCode for agentic coding
- Self-host LiteLLM, or using OpenRouter to access APIs
- Outsource inference to providers (using something like GLM 5.2 for coding tasks and maybe Mistral for language-based tasks).
Aside from the obvious benefit of learning how to engineer this kind of system, there are two benefits that come to mind:
- Potentially cheaper net costs (compared to Claude Pro or other end user packages) due to API-based, true usage billing. I rarely hit my weekly usage limit - in theory I am paying for ‘usage’ I am not taking advantage of. ‘Pay as you go’ API based billing may genuinely be cheaper, particularly as models like GLM and Mistral are much cheaper than Anthropic models.
- Potentially better privacy, as I host the chat interface myself and some inference providers do not log prompts after the fact. This is a double edged sword, as I need to select inference providers from regions that are culturally and legally more respecting of user privacy.
3: Minecraft server
The self-hosted classic. I’ve done this before on the Optiplex with success: relible performance even when accessing it internationally, and surviving a very deliberate self-inflicted griefing attempt without skipping a beat. However, now with genuinely important data and ‘prod’ apps on the Optiplex, despite being only for friends (player allow-listed), I am no longer comfortable hosting port-forwarded video game servers on the same physical device.
I’d like to hardware segregate this on an old laptop I have kicking around, and network segment it by placing it on the untrusted VLAN. Make VLAN firewall carveouts for things like backup jobs and allowing management access from the trusted VLAN into that machine, but not the other way.
Conclusion
If you made it this far, thanks for reading.